Overview
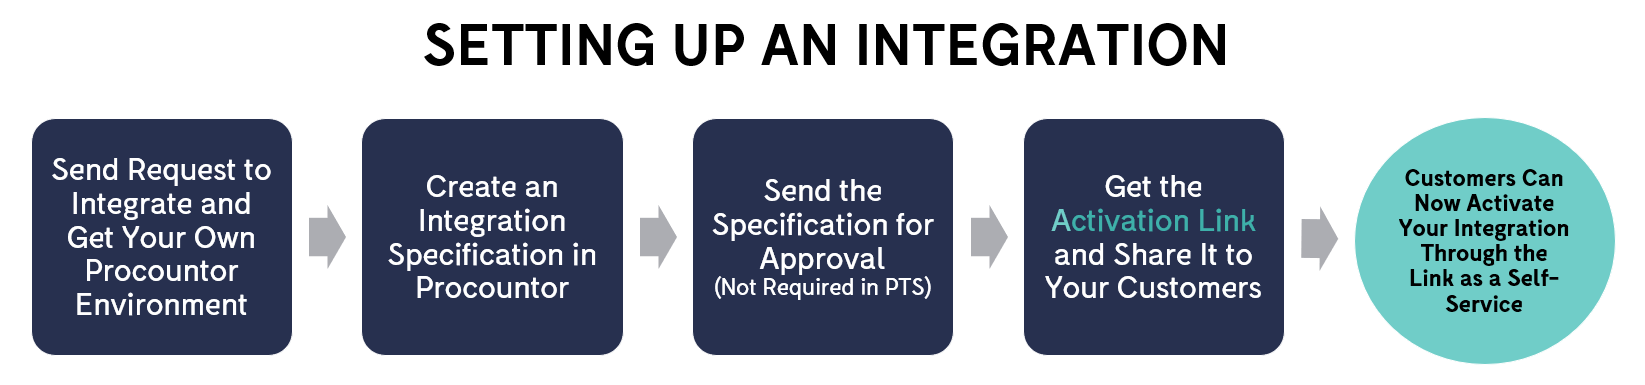
Creating an integration specification allows you to share your integration with customers, enabling them to take to the integration into their use within minutes.
Once approved, the integration can be activated. You will be able to copy an activation link, unique to your integration, which you can share with your customers. Through this activation link, your customers can activate the integration as a self-service to their selected Procountor environments.
Instructions
A. Prerequisites
Creating the integration specification is the first step for you, the integrator, to take before your customers can start using the integration. Please check that before creating the specification, you have performed these steps:
You have completed the integration to Procountor, i.e. it is functional and ready for the customers to use
If you have not yet completed this step, see:
General information (see also other articles under the same category)
Request access to production, or Request a testing environment
You use M2M authentication
You are prepared to provide the following information:
Your privacy policy
Terms of service
Support page/contact link (for your integration users)
A brief service description
You have set up your side of the API activation flow, i.e. the integration callback URL, where customers are directed once they initiate the integration activation.
While you are free to design the content of this stage, a few details need to be considered to ensure that the flow works seamlessly. Read more in the following section (B).
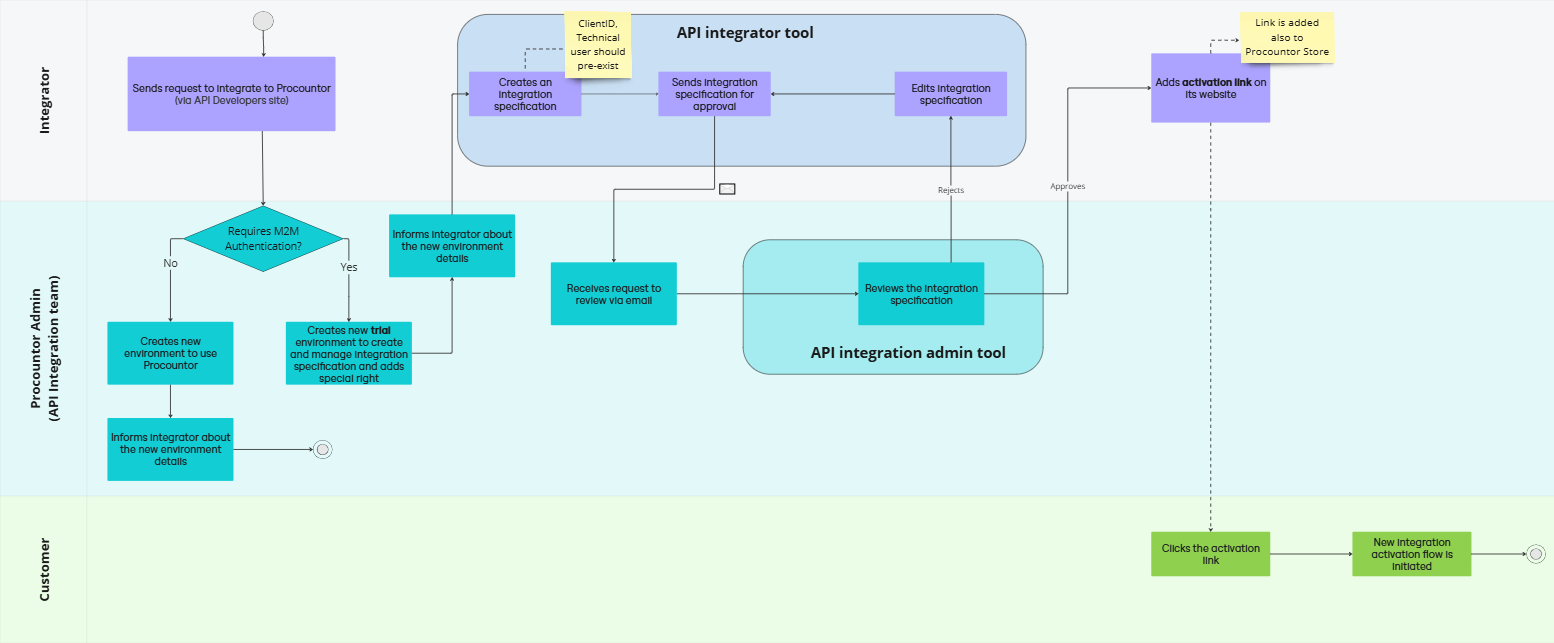
B. Preparing the integration Callback URL
As part of the integration activation flow, your customers will be directed to a 'Integration callback URL', provided by you. Technically, this step is required, so we can give you the activation request information and allow you to either accept or decline the requests that are generated through the activation flow.
The integration callback flow:
The user is redirected to your application
A request ID is sent in the link as
rq_idparameterPass through value is sent in the link as
partner_valparameter. You can specify the pass through value when creating an integration specification (see the instructions below)
Integrator calls
GET /integrations/{requestId}Get the information of the activation request, including e.g. integration id and basic customer info
Call the endpoint from the environment which contains the API integrator tool
Integrator calls
PUT /integrations/{requestId}Approve or reject the activation request(s)
In request body, integrator needs to tell which companyId to approve and which to reject
When rejecting the request, please provide the rejection reason so the customer is aware of it too
Note that the requestID is valid for 15 mins. Call this endpoint before the time expires
Call the endpoint from the environment which contains the API integrator tool
The callback URL is also your chance to:
request the customers to sign your agreement (if they haven't signed yet),
share important information that is not yet included in the integration specification URLs (privacy policy, terms of use, support page or official website),
review the customer's info, e.g. check whether they are an existing customer of yours,
... and base your approval/rejection decision on this information.
C. Opening the Integration Specification Flow
Log in to Procountor. In case you are a user in several Procountor environments, ensure that you are logged in the "integrator" environment. This environment is usually named with your company's or integration's name.
In your integrator environment, navigate to: Management > API Integrator tool.
Here, choose: Create new integration. This will open a new dialog for setting up the integration specification.
D. Fill In the Integration Details
The first step in creating a new integration specification is filling out information related to the integration.
| Integration basics | ||
|---|---|---|
| Integration name | The name of your integration | |
| Technical user username | The username of the technical user that is added to all the customer environments that activate the integration. Note that the username is visible to your customers. If you are creating a specification for an existing/active integration, fill in your current technical user's username. | |
| Client ID | The API Client ID that you received from the Procountor Integration team after you requested production access or a testing environment (PTS). If you are creating a specification for an existing/active integration, fill in your current Client ID. | |
| Maximum number of activations made at once | The maximum amount of simultaneous integration activations that can be requested by your customers. In case the user cannot activate all their integrations at once, they can start the activation process again. | |
| Software name | The name of your software that is integrated to Procountor | |
| Pass through value | The value that you want to pass through and track during the redirect stage of a customer's integration activation flow (See the instructions in Part B) . For internal use. | |
| Integration callback URL | The URL that is used to call our endpoints (See the instructions in Part B) | |
| Details | ||
| Company name | Your company name | |
| Company ID | Your company ID (e.g. 1234567-8) | |
| Terms of use URL | Provide the URL of your terms of use | |
| Website URL | Provide the URL of (official) website | |
| Support website URL | Provide the URL of your support page | |
| Privacy policy URL | Provide the URL of your privacy policy | |
| Contact email | The contact email for requests regarding your integration | |
| Service description | The service description for your integration. Please describe the features of your integrations in detail, as this section is used when we review your integration specification and assess the required user rights for the technical user. | |
| Required from the user | ||
| (select) | Select the information that you need from the customer (per activation request/environment). This information is sent to you when you review the activation requests. | |
| Additional settings | ||
| (select) Allow the usage of invoiceable API clients | The setting is automatically selected, as it is required for using integrations. | |
| (select) Receive email when active integration is removed | If unselected, you won't receive email when the customer removes an active integration (e.g. when API key for the API technical user is revoked) | |
E. Define the User Rights of the Technical User
Next, you are asked to provide a description of the user rights required by the integration. Please fill in this section carefully as it helps us to assess whether your selected user rights are suited for your integration's needs. The user rights and the rationale behind them will be reviewed by us when approving your integration specification.
After describing the user rights, define the user rights by selecting the appropriate values in each dropdown menu (per user right).
The user rights that are assigned to the technical user should align with the features of your integration. For example, if your integration is designed to create sales invoices to Procountor, the user rights should only include those necessary for creating sales invoices.
Please note that your customers will also see and accept the user rights of the technical user when they activate the integration. If you are creating a specification for an existing/active integration, select the same user rights that your current technical user is using.
F. Send the Specification for Approval
After you have filled in all the information, select: Send for approval. We will review your specification and approve or decline it in approximately 0-2 business days.
This stage is not required in PTS.
Approved
Congratulations, your integration has been approved! Your integration is now up and running, and you can start enrolling new customers by sharing them your integration-specific activation link. See more info in the following section.
Declined / Modifications are required
In case your integration specification could not be approved, you will be able to see the reason for the rejection in the API Integrator tool. The specification can be edited and resent for another approval.
To edit your specification, navigate to Management > API Integrator tool, select the specification row and click on Show details. Here, you are shown the same dialog that you used to fill in the integration specification details. Select Modify details to make the required changes and send the updated specification for approval.
G. Share Your Activation Link
After successfully completing the integration specification, you can copy the activation link. Your customers can use this link to send an integration activation request.
The link is specific to your integration and can be shared either publicly or privately, depending on your choice. For smooth customer activations, we recommend that you include the activation link to your integration's Procountor Store page. This way customers interested in your integration can send an activation request to you as a self-service.
In order to send an activation request, the customer will need Procountor credentials and an active Procountor environment.
See the customer's integration activation instructions to see what kind of steps they need to complete when they open the activation link. You are free to share these instructions with your customers, for example, together with your activation link.
H. Manage Integrations
Your integration specification, once it has been sent for us to approve, will be visible in Procountor in Management > API Integrator tool. Here, you can stay up to date with your integration specifications and manage their versions.
The integration tool allows you to:
-
search and filter integration specifications
-
modify integration specifications (and thus create a new version of a specification)
-
see the versioning of each specification
-
send integration specifications for approval
-
remove integration specifications
-
copy the activation link of approved integration specifications
-
view customers that currently use a specific integration
The API Integrator tool is available in the integrator environment. All users in the environment can access it.
Updating Integration Details
In the Api Integrator Tool, you can modify your existing integration specifications. To edit a specification, select the specification row and click on Show details. Next, select Modify details to update the specification.
If you need to change the technical user's user rights, for example in case a new feature has been added to your integration, the changes are reviewed and approved before they are implemented in a new integration version.
-
Admin Approval: The proposed changes are reviewed by our Integrations Admin team. Please provide the reasoning for the changes, as you were asked to do when you created the original integration specification.
-
Customers' Approval: Once approved, the proposed changes are shown to the integration users. The customers will see a prompt to update their integration on their Procountor front page. For more details, see the customer's instructions.
-
Updated Integration: The customer's integration is updated (with the new technical user's user rights) only after the customer accepts the changes. Until then, they will continue to use the previous version of the integration.
You will be able to track in API Integrator Tool which customers have taken the new version into use and when. To do this, select the most recent version row from the integration list and click on Show customers. In a similar way, you can also track which customers have not yet approved the changes.